Welcome to CondoCosmetics INC.

Search

Contact Us

(647) 675 5248

Welcome to CondoCosmetics INC.

Do’s and Don’ts for flooring installation Toronto

flooring installation Toronto

Do’s and Don’ts for flooring installation Toronto

Rate this post

Before you begin flooring installation Toronto, here are some things you should know (in our case, laminate flooring). Step one is to read the installation guide and the manufacturer’s guide. Installing laminate flooring correctly is critical since it will be a part of your home for many years! Using these laminate flooring installation recommendations, you can keep your floor in good condition both during and after installation. Make a copy of our Installation Dos and Don’ts list for future use!

Do’s of flooring installation Toronto

Before you begin flooring installation Toronto, check out this list of “DOs”:


  • Be sure to follow the manufacturer’s directions when installing new flooring.
  • Before beginning any work, determine the direction and design of the flooring.
  • The floor should be installed at least 48 hours after acclimating to room temperature.
  • The subfloor should be prepared, level, and tidy; it should also be strong.
  • Prep your laminate flooring installation tools by gathering them all together.
  • It is important to use the correct laminate underlayment when doing so (if it is not attached to your floor)
  • Underlayment seams should be taped as you lay them down.
  • Check for noticeable damage to planks. It is suggested that you examine three boxes at random.
  • Install laminate with the use of a laminate installation kit.
  • Use waste laminate as spacers to keep the expansion gap the same size and save money.
  • Ensure there is at least a.25′′ space around the outside for expansion. If you have a vast area, leave 0.5′′ of space.
  • Planks should be staggered one plank width apart in each row.
  • For structural stability, joints should be between 12 and 18 inches apart.


flooring installation Toronto

Don’ts of flooring installation Toronto

Before you begin flooring installation Toronto, check out this list of “DON’Ts”:


  • Install laminate on any floor that has a drain.
  • Don’t put laminate on an uneven subfloor.
  • Make sure that you don’t install laminate flooring in a place that is always wet or where the humidity is extremely high or low.
  • Laminate flooring should not be installed in an outside area.
  • Don’t put laminate on top of the carpet in a residential home.
  • The locking system and the integrity of the joints can be compromised if you install a double layer of laminate underlayment.
  • If your laminate floor is longer than 30 linear feet, use a transition strip to make the transition easier.
  • If the aperture is less than 48′′ wide, you must utilize a transition molding to complete the installation.
  • Keep your installation location free of dust and dirt by not cutting laminate in the same place where you’re putting it (flooring, subfloor, underlayment)
  • The decorative top layer of laminate will chip if you cut into the laminate’s back. The decorative layer should always be sliced into while producing a cut.
  • Never glue wall base molding or quarter round to the floor; instead, attach it to the wall with enough clearance to expand and contract.
  • A word of advice: When buying laminate flooring, be careful to include any thresholds, quarter round, or base molding in your order. As a reminder, laminate flooring can be customized to fit any decor. Laminate flooring is a long-term investment that will pay dividends for years to come.


How to Cut Laminate Flooring

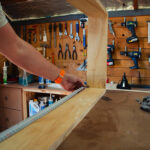
Before flooring installation Toronto, when you are cutting or ripping laminate planks, don’t worry too much about your technique. The fiberboard core of the planks allows for easy slicing. Perfect cuts aren’t necessary because they’ll be covered up by the baseboards and molding when they’re installed.

Even a handsaw can be used in a table saw for some jobs, but it isn’t always the greatest option. With fine-tooth saw blades, the laminate surface is less likely to be chipped during the cutting process. A jigsaw is considered the greatest tool for making good notches, curves, and other specialized cuts. Because circular and jigsaws cut through the material, most chipping occurs on the workpiece’s top side. The board’s reverse should be trimmed to reduce the risk of chipping. The planks are chopped face up with a table saw in this scenario.

Leave a Reply

Your email address will not be published. Required fields are marked *

Latest Posts