Welcome to CondoCosmetics INC.

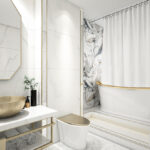
When Painting Kitchen Cabinets, choose the right paint and primer for a high-quality finish without breaking the bank.

Working diligently in advance of painting the cabinets is key to a successful Painting Kitchen Cabinets project. Begin by removing all freestanding appliances and cleaning the countertops and cabinets. Furniture should be moved to a different area—overlay counters and floors with rosin paper. Protect the rest of the house from dust and fumes by covering the backsplash, windows, fixed appliances, and interior doorways with plastic tape. Remove the paint from the wall around the cabinets. Set up a workstation for painting cabinet doors, drawers, and shelves.
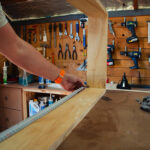
Painting Kitchen Cabinets calls for clearly marking the front and back of each drawer and cabinet door with a marker to avoid doors being accidentally mixed up. The hinge location is the best place for this mark. Remove the doors by loosening the hinge screws from the cabinet frame. Using a numbered piece of tape, label each one from left to right, top to bottom. Also, don’t forget to label the undersides of cabinet drawers and the shelf edges. Remove the shelf-hanging hardware from the room. Remove the handles and hinges from your desk and save them for future use. Replace the tape and seal the area.
Spray the cabinet with a degreaser solution and wipe it down with a rag to remove any stubborn stains. This eliminates any oils or grease that might get in the way of a flawless finish. Try a more powerful cleaner like trisodium phosphate (TSP), which can be purchased at hardware and paint stores to get the job done. Make sure to follow the container’s safety instructions. The cabinet pieces should be rinsed thoroughly with water and dried after being thoroughly sanitized.
The windows should be opened to allow for ventilation while Painting Kitchen Cabinets. Scrub all surfaces with a liquid deglosser and an abrasive pad. Keep a rag handy to catch any drippings. Remove any remaining deglosser residue with a clean, deglosser-dampened rag before it evaporates. Use two-part polyester wood or autobody filler to cover up old screw holes when moving the hardware. Mix only a few batches at a time because it sets in about five minutes. Overfilling the holes is necessary because the filler shrinks as it dries. Remove the excess with a paint scraper as soon as it sets. Sand it to a smooth finish if it hardens completely.
Scuff the cabinet’s doors, drawers, and other surfaces with a foam sanding block. Don’t sand down to the bare wood; this light sanding gives the primer something to adhere to. Using a tack cloth, wipe down the cabinets both inside and out to ensure that no specks of dust are left behind.
The primer is now complete. Use a stain-blocking primer before Painting Kitchen Cabinets to protect the surface from bleed-through of the topcoats if the cabinets are heavily stained. But in many cases, an oil-based or 100% acrylic latex primer will suffice, and stain-blockers are unnecessary. Prime the cabinet, doors, and drawer fronts by applying a primer layer with a brush along the edges and in tight spots and a roller to the large, flat surfaces. “Tip-off”—lightly brush over the wet finish in the direction of the grain—starts at the top of the cabinet. Brush primer across the grain. Always tip-off from one end to the other in a single motion.
When using the brush, follow the cabinet or door’s underlying structure. To paint the stile and rail where they meet, paint the rail first and allow it to dry slightly before painting the stile. You can wash your brushes and roller sleeves while the primer is drying, and you can pour the remaining primer back into the can before cleaning the paint tray.